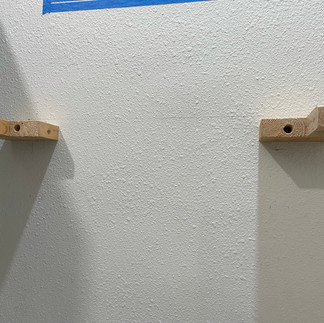
This wall was empty and just begging for a floating shelf. Since I still had a lot of sanded birch plywood leftover from my closet reno, I decided to build one instead of purchasing. Here are the steps I took to create the exact dimensions I needed:
Measure and tape off the exact size you want on the wall to help visualize the end product. I built a 48" x 9" x 2 1/2" shelf.
Find and mark the studs in the wall. This shelf was heavier than I thought it would be and I still wanted to put items on it so it needed to be well supported. You can purchase or build brackets to help, but I wanted this to be a true "floating" look.
Cut the sides, front, top and bottom pieces. Sanding them smooth was easy with the Ryobi Sheet Sander. Cuts were made with the 18V Ryobi circular saw. The corners can come together by butting the pieces or by cutting them each at a 45 degree angle and seamlessly attaching them with a brad nailer gun and wood glue. I was really intimidated at first to use my Ryobi nail gun ; however, now that I'm more adept at using it, I absolutely love it!


4. The wood was stained by lightly applying a dark walnut on the first layer. Once that layer was dry, I went over the walnut with a weathered gray color. All stain was first applied with a brush, then wiped off. Lastly, I lightly dry-brushed a white chalk paint over the top and rubbed it off to blend.
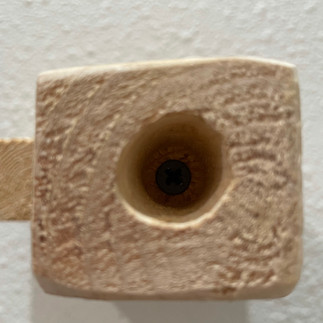
5. One of the most important steps was coming up with a way to support the shelf. Since this shelf was 48" long, the most ideal way would be to use three supports spaced evenly apart and inserted into the hollow inside of the shelf. Each support would be screwed into a stud. Sounds easy right? Well, since this laundry room was an add-on expansion, my stud finder told me something large behind the wall was in the way of the third support. This meant there would only be two supports on this shelf and they would have to be strong. This is what I came up with:
A spade bit on my DeWalt Cordless Drill enabled me to create this hole in the middle of the support so that a screw could reach the wall and be drilled into the stud. I'm no expert, however this felt like a better solution than drilling pocket holes. Another hole and screw needed to go into the back piece of the support. These supports needed to stick out in order to keep the 9 inch depth of the shelf from leaning forward from the wall. I didn't have any wax, so I used a bar of soap to rub on the supports so that when I slid the shelf on, they would slide easily. Worked like a charm!
5. Time to slide the shelf on the wall! Be sure the shelf is level. Since the shelf was going to butt up against the tall cabinet on one side, I went from the inside of the cabinet and added one more screw to secure the shelf from the side.


Install complete! Floating shelves this large on Etsy and big box stores cost upwards of over $130 each. Since I had the scrap wood and tools, this project was free!
Murphy approves of this design! I hope this gives you just the inspiration you need to build and create your own floating shelf! Believe me, if Kellbellcan, so can you!


Commentaires